About Me

My photo
Wife, Mother, Mimi, lover of all things creative... sewing, embroidery, painting, collage... God and family are the most important things in my life.

Monday, April 23, 2012

California Dreaming or Were We Really There?


We've been home from California almost a week, and it almost seems like it was all a dream.


We enjoyed our time so much! We saw some beautiful sights, ate some wonderful food, and enjoyed time with family we haven't seen in years.


I had every intention of blogging about it all as soon as we got home, but when I started going through the pictures I just couldn't narrow them down to just a few. So I may do a mini series of posts on our trip, kinda like the old vacation slide shows of yesteryear. At least you have the comfort of knowing I won't be the wiser if you decide to check out early.

This first set of pictures were taken on our trip to King's Canyon to see the giant Sequoias.


These trees are so big, there just isn't any way to capture the majestic size of them with a point and shoot camera.

As you can see it snowed the day before we got there. The road to the Sequoia National Park was closed, but we were able to see Grant's Grove and those trees were quite impressive!


There were snowballs hurled, a couple of trips down a snow covered bank with an inner tube, a tailgate picnic, and even a little snowman built all in a very pleasant 57 degree afternoon.

Tuesday, March 27, 2012

Spring in Atlanta


I had a ball last week with my sister-in-law in Atlanta.


It seems like spring came to Atlanta early and I'm so glad I was there to see it.


The dogwoods were in full bloom along with the azaleas and wisteria. Now can't you just smell it? I just love the smell of wisteria.


Lucy and I tried to rival the color of the flowers with our multi-colored tresses. Okay, maybe we got a little carried a way, but it was fun.


We joined Jae for a junk jaunt, and then off to the Greater Atlanta Shop Hop! We hit every shop, had our passports stamped, and are still waiting to be called and told of our good fortune. We may be waiting for quite a while......


Monday, March 26, 2012

Folk School and Quilt Shop Hop


John C. Campbell Folk School is a wonderful place! If you ever get the opportunity you should go and take one of the over 800 different classes they offer. The hardest part about it is choosing just which class to take. If you can think of a skill or art form, they offer a class in it.


I had an amazing time, and met so many wonderful people.


Besides the class, and the wonderful food we were served at each meal, there was all sorts of different opportunities for learning folklore, folk songs, and the interesting history of the school and the Appalachian people.


There were demonstrations given almost every evening by local artist as well as some of the instructors. I particularly enjoyed the ones on pottery and marbling (I'm including pictures taken during the marbling demonstration).


The storytelling class entertained us one evening with stories that I may have to try out on my grandchildren.


The thing that fascinated me most though was the Morris Dancing. I had never seen anything like this and would love to try to learn, but I have a great fear of knocking someone's head off. I had never heard of Morris dancing before, and incase you are in the same boat this is the description of it from the school's website:
The earliest record of Morris dancing dates from the aftermath of the crusades. It was a seasonal, ritual dance done by men in disguise, often at Christmas or May Day, with vaguely symbolic meanings. The “Border” version is mock sword fighting and bluff, and came from the English side of the Welsh border, and was intended to show those Welsh what they would get if they dared come over that border. Dancers perform with painted blue faces, colorful rag coats, loud leg bells, and plenty of attitude. They beat sticks together and shout rude taunts; even more cruel, sometimes they sing

The class I took was great! It was a class on Still Life Painting in Oils in the Style of the Old Masters. Melody Boggs was the instructor and we all learned so much. The class was just the right size to facilitate individual instruction, and the people in the class were so encouraging and kind. I will be sharing some of the pictures of my paintings later.

My camera went crazy on me while I was away, and it's still acting crazy. All of my pictures have a fuzzy element. I'm sorry. I didn't take many because I could tell they weren't turning out that great.


Friday, March 9, 2012

Stitching Little Red


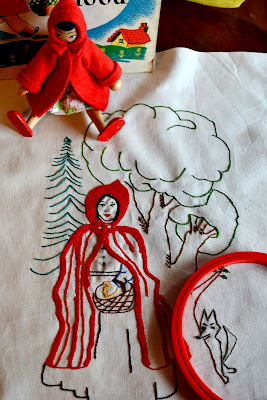
As a girl who loves the color red, I can't help but be partial to a fairy tale that sports the color in the title. I guess I'll go ahead and confess that I always wanted a red hooded cape, and of course, a basket full of goodies wouldn't get turned down around here either. I'd even share them with Grandma...... oh wait, I am Grandma! Anyway, what I'm trying to tell you is I liked the story of Little Red, it has just enough scary in it to be fun, and it's so outlandish even a child couldn't really be scared for long. I mean who would really believe that an old hairy wolf was Grandma? Grandpa maybe, but surely not Grandma!


I've been working on a piece of embroidery from the story. I'm not sure what I'm going to do with it when I finish it. I might put it on an apron, or maybe make a pocket for a book bag, or use it for the focal piece of a quilt. Either way, I'd love to pair it with some of Aneela Hoey's A Walk in the Woods fabric.


I'm afraid my Little Red looks a little older than the character from the story, but I still kind of like it. Do you think this may be some sort of Freudian slip that has to do with me still wanting that cape?


Thursday, March 8, 2012

More Vintage Pretties


Sorry to have disappeared for so long again. Sometimes it is just that I really don't have that much to share, and other times I have plenty to share but simply lack the time to share it. This time it has been a little of both. There are a few projects I'm working on that I am aching to share, but they are gifts, and I don't want to spoil any secrets. In addition to gifts in the making I have a hundred projects going on in my head, but I seriously doubt I'll live long enough to finish them all.

So, instead of sharing my secrets, I thought I'd share some sweet vintage lovelies that have come my way. Each was a gift and I adore them all!


First of all, this is a little planter my sister-in-law gave me for my birthday. As I've mentioned many times I love vintage planters. They line practically every window sill, they sit on each of my stairs, every open cupboard or shelf is graced by at least one, and any piece of furniture with a place to set something is also garnished by a little planter. Isn't this one just darling? Look at that sweet thing blowing kisses. Don't you just love it? I do! And it will make a darling vase at baby showers too.


Next is an adorable little
jadeite juicer. It is about the size of a teacup. I've never seen one like it, and since I collect glass juicers and jadeite it is perfect! Someone thought they were being sly during a recent visit when they snuck this
little cutie onto my tea cart with my other juicers. They thought I wouldn't notice it until they were gone. WRONG! I was chattering away and froze mid-sentence when my eye caught this little pretty. Busted! I love it! I need to run to the store and get some limes and lemons. I see freshly squeezed juices and aides in my immediate future!


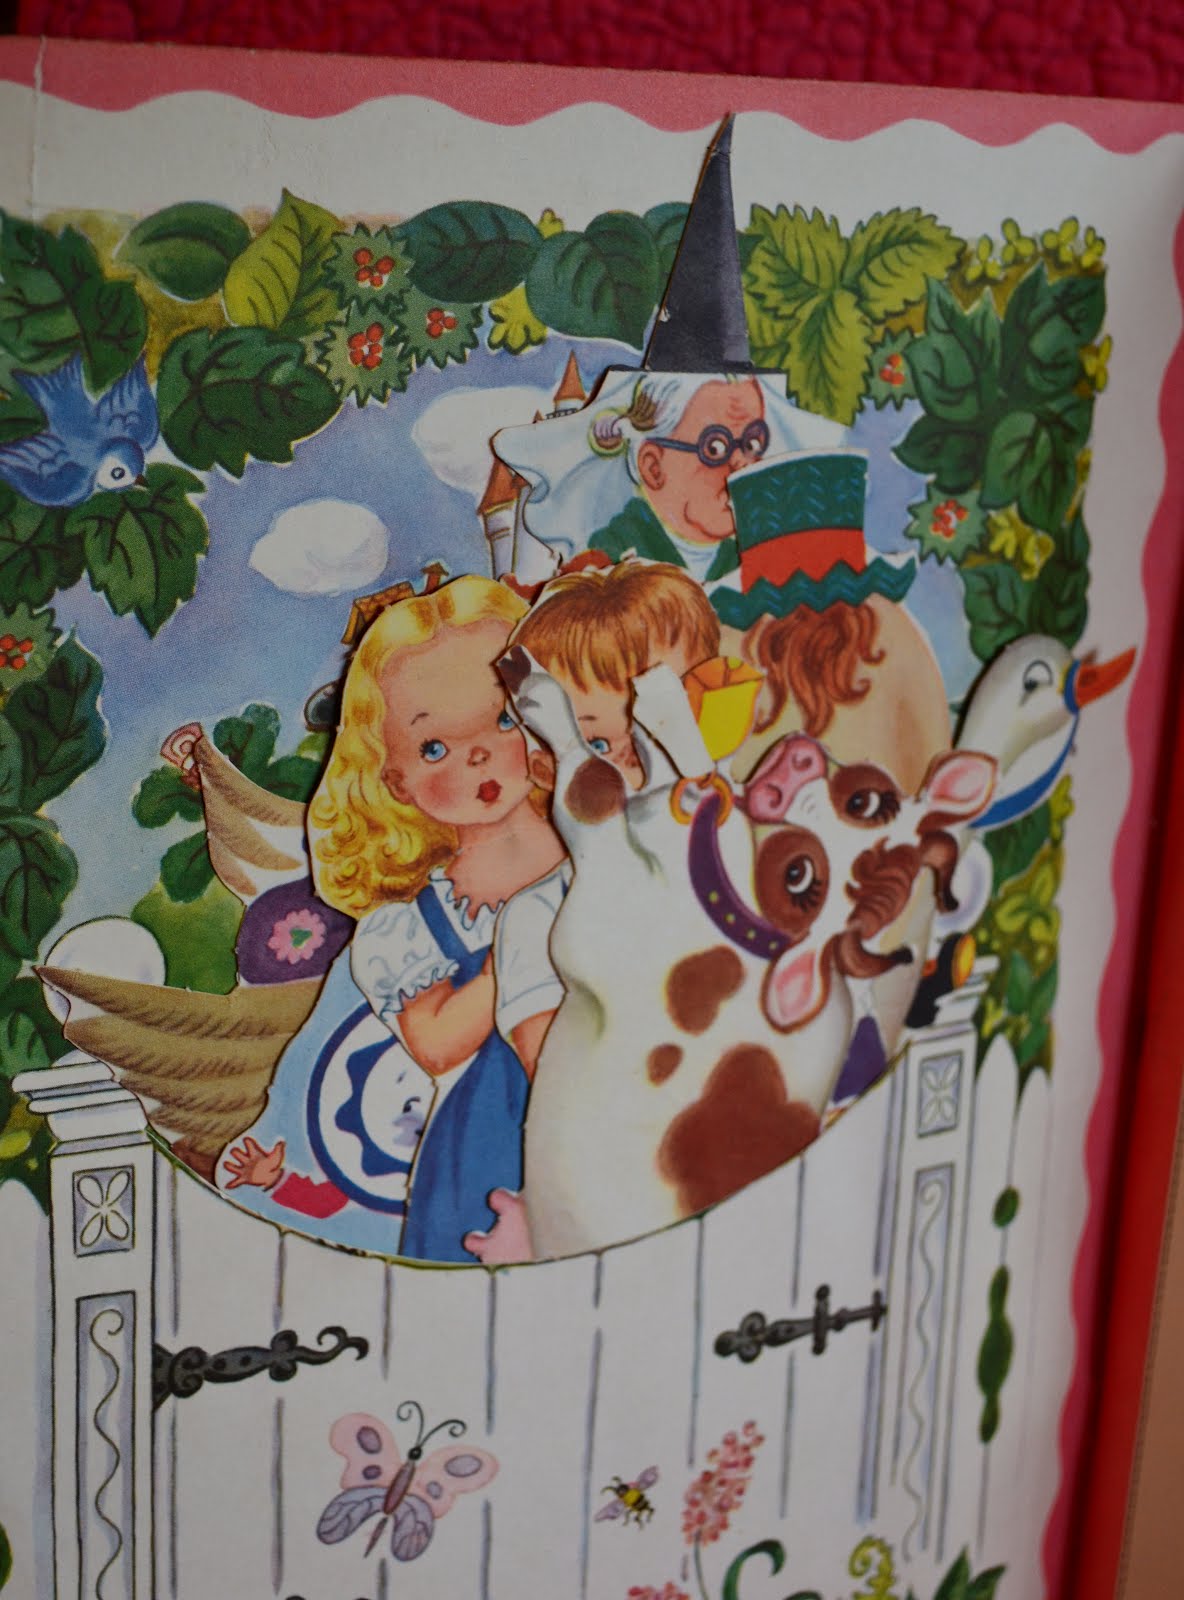
Now, this is something I've never seen before. It's the sweetest little vintage children's paper-doll activity book. The book has a pocket behind the picket fence the dolls and other props can be stored behind it. The book has lovely scenes from various nursery rhymes, and you can dress the dolls to play the part of the character and walk them right through the scene in the book. How clever is that? The illustrations are so whimsically
charming and the outfits are stored in a trunk on the very last page. Now just try to tell me you wouldn't want to play with this yourself! This is going to be a very special toy for the grandchildren that only comes out when each
one is here alone. I have to be honest and say I'm looking forward to that play time as much as they will!


Saturday, February 25, 2012

Grapefruit Frenzy and a Recipe


I've been on a grapefruit kick this week. Not the good for you kind of kick either, although I need a swift kick in the pants to start me in that direction. Instead of eating them as is I decided to see what I could make with them. I've never cooked with grapefruit before other than having one broiled occasionally. So I went on a Google search and then to Pinterest and found a few things that sounded tasty.

First, I found marmalade that looked rather laborious, but I was in the mood so I tried two different recipes. Then I moved

on to curd and gave that a try, my kids had both given me fresh eggs from their chickens which added a beautiful rich color to the curd, and it tasted wonderful, at least that is what my husband said after a midnight raid of the refrigerator. Finally, I found scone recipes. I've never made scones before, and to be honest I wasn't sure I would like them, but I decided to give it a go.


There was a wide variety of recipes online, and after scouring them for much too long I decided to take what I had read and try my own mixture. I had a general idea from all the recipes I read the basic ingredients and measurements.


Oh, my! I'm not so sure this was a good idea. They are soo good! I've made two batches, and no, I did not eat them all myself, although I could have.

The recipe is below in case you want to give it a try. If you happen to have a grapefruit recipe you don't mind sharing let me know. I think I have about 5 grapefruit left.


Almond scented Grapefruit-Poppyseed Scones

2 cups self rising flour
4 Tbsp butter, cold
Up to 3/4 cup cream
3 Tbsp grapefruit zest mixed with 1/4 cup sugar, divided
1 tsp almond extract
2 Tbsp honey
1 grapefruit segmented, membranes removed
1 Tbsp poppy seeds
1 egg
2 Tbs grapefruit juice

Glaze

1/2 cup powdered sugar
Up to 2 Tbsp grapefruit juice
a few drops Almond extract

Cut butter into flour as you would for making biscuits.
Mix grapefruit zest with sugar pushing together with the back of spoon to infuse the grapefruit oils into the sugar.
Stir poppy seeds and 2 tablespoons of the zest-sugar mixture into flour mixture.
In a 1 cup measuring cup stir egg, honey, and vanilla.
Add grapefruit juice to wet mixture and then fill with cream to the 1 cup mark.

Cut segments of grapefruit each into 3-4 pieces and add to flour mixture.
Gently stir liquids into flour and turn onto a large, flat, iron skillet or large pie pan, top with remaining sugar-zest mixture, and pat down gently.
With a large knife cut the dough into 8 wedges. Bake at 425 for 15-18 minutes or until toothpick inserted comes out clean.

For glaze, mix almond extract and juice into sugar a few drops at a time until the glaze reaches a glaze like consistency. Drizzle over warm scones.


This is before the glaze was added.

Tuesday, February 21, 2012

Grapevine Wreath from Scratch


I know you can usually buy grapevine wreaths fairly inexpensively, but there is just something about making something from things you can find in your own back yard. Wild grapevines can be found in the woods practically anywhere you live. I rescued these from the burn pile after helping some friends trim their grape arbor where we picked grapes last fall.

The first step in putting together the wreath is to find a relatively long vine and make a circle out of it.


Next, you want to wrap the parts that extend beyond the circle around the exisiting circle. You will probably have a little piece that sticks out, that's okay. You can catch it up under the next vine you add.

Take another vine and just wrap it around the existing circle. Continue to wrap vines until the wreath is the size you want you can make the wreath as large and as thick as you like. It's really pretty simple.


You can then decorate the wreath for any occasion or holiday. Look at this beautiful one my daughter and grand daughter made for Easter. I'm hoping to persuade them to make one for me and possibly I can take pictures and show you how they did it.

I'm linked up with Ruby Jean blog for Sew Crafty Tuesday

Saturday, February 4, 2012

Valentine's Almond Cherry Pound Cake


If you are looking for a pretty, pink, homemade treat for Valentine's Day look no further. This is a simple homemade pound cake that is sure to hit the spot with your Valentine. The frosting is very rich so I choose to warm just a little in a cup and drizzle it instead of frosting the whole cake with it, but you decide which way you like it best. If you are making it for a shower or a birthday frosting it might make the decorating a little more versatile.


This cake pairs very nicely with vanilla or cherry vanilla ice cream and homemade hot fudge!


Almond Cherry Pound Cake:


1 cup butter, softened


1/2 cup shortening

3 cups sugar

6 large eggs

1 (6-ounce) jar red maraschino cherries, drained and chopped (save 4 tbl. cherry juice to add to cake batter)

1 tsp. almond extract

3 3/4 cup cake flour

1/4 tsp. salt

3/4 cup half and half

Cherry cream cheese glaze/frosting


Beat butter and shortening at med. speed with an electric mixer about 2 min. or until creamy. Gradually add sugar, beating at med. speed 5 to 7 min. Add eggs, one at a time, beating just until yellow disappears. Stir in cherries, cherry juice and flavoring. Combine flour and salt; add to the butter mixture alternately with half-n-half, beginning and ending with the flour mixture. Mix at low speed just until blended after each addition. Pour batter into a greased and floured 10-inch tube pan. Bake at 300 degrees for 1 hour and 45 min. to 2 hours or until a wooden pick inserted in center comes out clean. Cool in pan on wire rack 10 min. Remove from pan, and let cool completely on wire rack. Frost top and sides of cake with cream cheese frosting.


Cherry Cream Cheese Frosting:


2 tbls. chopped cherries, with juice

4-ounces cream cheese, softened

1/4 cup butter, softened

1/2 (16-ounce) box powdered sugar, sifted

1 tsp. almond extract


Combine cream cheese and butter, beating until creamy. Add sugar and almond; beat until light and fluffy. Stir in cherries and juice. Yield: 1 1/2 cups. You may use this as a frosting (you might want to double it if you like a lot of frosting.) I heat this a little in the microwave and drizzle over the cake instead.